lap size construction
CUTTING INSTRUCTIONS:
- Fabric 1 Light: (6) 1-1/2” x WOF strips.
- Fabric 6 Main print: Cut (6) 5” x WOF strips.
- Fabric 8 Border stripe or coordinating print: Cut (4) 3-1/2” x LOF strips. (Cut along one of the stripes the length of the fabric.)
- Cut (6) 2-1/4” x 45” LOF for the binding.
PIECING INSTRUCTIONS:
Mark the 1/4” seam allowances on all four corners of the center star.
Mark center and measure 15 1/4” from center on each end of the (4) 3-1/2” x 40” Fabric 8 strips. Mark these points.
Right sides together, pin border section to the top of the quilt, matching centers and the 1/4” marks of quilt top to the marks at the ends of the border stripe. Stitch the strip to the quilt top, starting and stopping stitching 1/4” from each end. Back stitch at each end to lock stitches. Repeat with the other three borders,first the bottom then the two sides. Press seams toward the borders.
Mitering Corners
To miter the borders, fold one corner of the quilt on a 45° angle so that the border strips are directly on top of one another and the seams nest together. Place your rotary ruler
on the fold of the quilt so that the long edge is against the fold and the 45° line is on the side seam.
Draw a line from the corner of the quilt top to the outside edge of the border. Pin the borders together.
Position your needle on the inside corner where the border meets the quilt. Stitch directly on the line you have drawn to the outside edge of the border. Back stitch at the seam intersection.
Trim the excess fabric leaving a 1/4” seam allowance. Press. Repeat the process for the remaining three corners of the quilt. The outside of the quilt should equal 36-1/2” square.
PIECED BORDER:
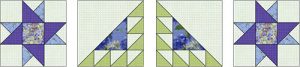
Sew (2) Block 1 and (2) Block 3 as shown.Press seams open to reduce bulk. Make (4)sets.
Sew this unit to the sides of the quilt. Press to Fabric 8.
Sew (2) Block 2 to the ends of the remaining (2) units from step 8. Press seams open to reduce bulk. Sew to the top and bottom of the quilt. The outside of the quilt should equal
54-1/2” square.

Sew the (6) 1-1/2” x WOF Fabric 1 strips together with diagonal seams. Press seams open.
Trim to (2) 54-1/2” and (2) 56-1/2”.
Sew the (6) 5” x WOF Fabric 6 strips together with diagonal seams. Press seams open.
Trim to (2) 56-1/2” and (2) 65-1/2”.
Layer the quilt top, batting and backing and quilt as desired. Bind
Queen size construction
CUTTING INSTRUCTIONS:
- Fabric 2 Green:
Cut (4) 1-1/2” x WOF strips.
Cut (4) 6-1/2” x 6-1/2” squares. - Fabric 5 Light purple: Cut (6) 3-1/2” x WOF strips.
- Fabric 6 Main print: Cut (10) 6” x WOF strips.
- Fabric 8 Border stripe or coordinating print:
Cut (4) 3-1/2” x LOF strips. (Cut along one of the stripes the length of the fabric.)
Cut (10) 2-1/4” x 45” LOF for the binding.
PIECING INSTRUCTIONS:
Mark the 1/4” seam allowances on all four corners of the center star.
Mark center and measure 15 1/4” from center on each end of the (4) 3-1/2” x 40” Fabric 8 strips. Mark these points.
Right sides together, pin border section to the top of the quilt, matching centers and the 1/4” marks of quilt top to the marks at the ends of the border stripe. Stitch the strip to the quilt top, starting and stopping stitching 1/4” from each end. Back stitch at each end to lock stitches. Repeat with the other three borders,first the bottom then the two sides. Press seams toward the borders.
Mitering Corners
To miter the borders, fold one corner of the quilt on a 45° angle so that the border strips are directly on top of one another and the seams nest together. Place your rotary ruler
on the fold of the quilt so that the long edge is against the fold and the 45° line is on the side seam.
Draw a line from the corner of the quilt top to the outside edge of the border. Pin the borders together.
Position your needle on the inside corner where the border meets the quilt. Stitch directly on the line you have drawn to the outside edge of the border. Back stitch at the seam intersection.
Trim the excess fabric leaving a 1/4” seam allowance. Press. Repeat the process for the remaining three corners of the quilt. The outside of the quilt should equal 36-1/2” square.
1st PIECED BORDER:
Sew (2) Block 1 and (2) Block 3 as shown.Press seams open to reduce bulk. Make (4)sets.
Sew this unit to the sides of the quilt. Press to Fabric 8.
Sew (2) Block 2 to the ends of the remaining (2) units from step 8. Press seams open to reduce bulk. Sew to the top and bottom of the quilt. The outside of the quilt should equal
54-1/2” square.
Sew the 3-1/2” Fabric 5 strips, short ends together with diagonal seams. Press seams open. Trim to (2) 54-1/2” and (2) 60-1/2”.
Matching centers and ends, pin and sew the 54-1/2” length to the sides and the 60-1/2” length to the top and bottom. Press to border. The outside of the quilt should equal 60-1/2” square.
2nd PIECED BORDER
Sew (10) Block 4 together as shown. Press seams in one direction. Make (4) sets.

Matching centers and ends, pin and sew to sides of the quilt. Press to Fabric 5 strip.
Sew a 6-1/2” Fabric 2 square to each end of the remaining (2) sections from step 13. Press to Fabric 6. Sew to top and bottom of the quilt. Press to Fabric 5 strip.

Sew (2) 1-1/2” Fabric 2 strips short ends together with diagonal seams. Press seams open. Trim to 1-1/2” x 72-1/2”. Make (2) sets. Matching centers and ends, sew to top and bottom of the quilt. Press to Fabric 2. Quilt should equal 72-1/2” x 74-1/2”.
3rd PIECED BORDER
Starting with Block 5, alternate (5) Block 5 and (4) Block 6 and sew together as shown. Press seams open to reduce bulk. Matching centers and ends, pin sew to top and bottom of the quilt. Press to Fabric 2.

Sew the (10) 6” x WOF Fabric 6 strips short ends together with diagonal seams. Press seams open. Trim to (2) 6” x 90-1/2” and (2) 6” x 83-1/2”. Matching centers and ends, pin and sew the 90-1/2” sets to the sides. Press to Fabric 6.
Matching centers and ends, pin and sew the 6” x 83-1/2” strip to the top and bottom.
Layer the quilt top, batting and backing and quilt as desired. Bind
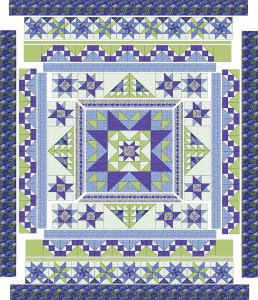
Medallion Mystery by: Toby Lischko
www.gatewayquiltsnstuff.com